Robert Panas (16-ERD-006)
Project Description
Additive manufacturing processes have great potential to engineer materials by enabling the precise localized control of geometry and properties over a large volume. However, these processes have failed to deliver on this potential because of uncontrolled process variations. For example, additively manufactured parts currently fabricated at LLNL frequently fail tolerance requirements for geometry, surface finish, and material quality because of process uncertainty. The ability to accurately measure process variations is critical to reducing this uncertainty so that additive manufacturing processes can be integrated into fabrication for field-specific applications. The unique challenges posed by additively manufactured parts—internal features, spatially varying properties, and irregular shapes—negate the use of existing precision metrology techniques. Computerized tomography produces three-dimensional images of an object by x-ray imaging from several different angles and computationally combining these images, and is a viable alternative to existing techniques. However, commercially available computer tomography systems are often optimized for nondestructive testing or medical imaging, fields in which qualitative measurements are generally sufficient to successfully diagnose anomalies. Such data have limited value to accurately quantify variations in additively manufactured parts. We will develop precision computerized tomographic metrology specifically for additively manufactured parts to measure characteristics such as part geometry, surface finish, and density. To accomplish this goal, we plan to explore the science and physics of a computerized tomography machine to generate an understanding that lets users make informed performance trade-offs between speed and resolution. Our efforts to improve continuous tomography will consist of a combined multigroup machine design, metrology, and modeling effort. We will feed information gathered through continuous tomography scanning of parts back into the modeling effort to better control the process, provide predictability, and ultimately improve the manufacturing process.
Additive manufacturing is a rapidly evolving field, whose general trend is moving from demonstrating new processes to fine-tuning them. As it matures, end users place increasing demand on the fabrication process to generate parts within strict tolerances defined by real-world usage conditions, including the need to meet geometry, surface finish, and material quality requirements. Our project will meet the growing demand of adding precision to additive manufacturing by developing a continuous tomography capability that can obtain information at the nanometer scale. As a result, we expect to improve LLNL's precision continuous tomography metrology capability in the range of 65 µm to 200 nm, providing users with more and better information about the resultant parts as well as machine models so that they can make trade-offs between speed, spatial resolution, and signal-to-noise ratios. This improved capability will be used to understand and control the additive manufacturing of polymer parts, allowing users to deterministically fabricate such parts with geometry, surface finish, and densities that are within design tolerances, and allow the further development of additive manufacturing of metal parts on other additive manufacturing systems, such as metal powder-bed machines.
Mission Relevance
This project will enhance LLNL’s core competency of advanced materials and manufacturing by advancing development of rapid, cost-effective manufacturing processes of polymer, and ultimately metal systems, using additive manufacturing. Such efforts will also advance the nondestructive evaluation of additive manufactured parts such as targets for the Laboratory’s National Ignition Facility, directly supporting the strategic focus area in inertial fusion science and technology.
FY16 Accomplishments and Results
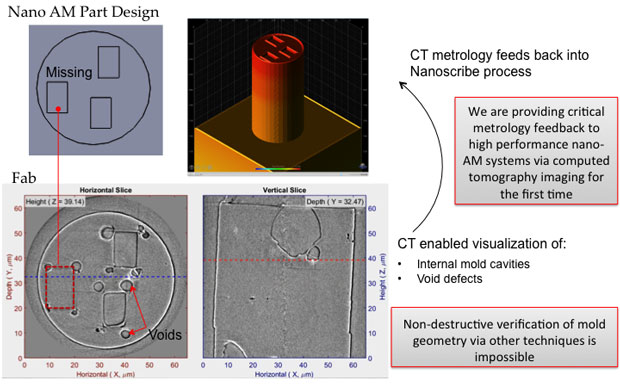
In FY16 we have (1) initiated the machine characterization process; (2) developed physics models of the Nanoscribe two-photon polymer stereolithography, additive manufacturing machine; (3) used computerized tomography to identify internal and structure printing effects, as shown in the figure; (4) developed an uncertainty mapping framework; (5) laid out a quantitative density uncertainty model; (6) developed a set of characterization tests to tune the density-uncertainty computerized tomography model to individual systems; and (7) carried out the characterization on a single-pixel x-ray gauge.
Publications and Presentations
- Cuadra, J. A., and R. M. Panas, An uncertainty model for x-ray computed tomography metrology using a systems approach. (2016). LLNL-ABS-687039.
- Cuadra, J. A., and R. M. Panas, A system approach to quantifying uncertainty in x-ray systems for metrology. Dimensional Accuracy and Surface Finish in Additive Manufacturing, Raleigh, NC, June 27–30, 2016. LLNL-PRES-697720.
- Cuadra, J. A., and R. M. Panas, Uncertainty quantification of an x-ray system via a 0D model using a systems approach. 31st ASPE Annual Mtg, Portland, OR, Oct. 23–28, 2016. LLNL-ABS-702326.
- Saha, S., et al., Part damage due to proximity effects during sub-micron additive manufacturing via two-photon lithography. ASME Manufacturing Science and Engineering Conf., Blacksburg, VA, June 27–July 1, 2016. LLNL-CONF-679759.


